Development Environment
Source Code, Compilers, and System Generator
NUCLEO-F411RE Board Support
The NUCLEO-F411RE board is very similar to the NUCLEO-F401RE board. The major difference between these two boards is the microcontroller. The NUCLEO-F411RE board features a STM32F411RET6 microcontroller with 128K SRAM, 512K Flash, and 100MHz frequency. Like the NUCLEO-F401RE board, the NUCLEO-F411RE board also supports both the Arduino and Morpho headers. You can take a look at the extension shields supported by the NUCLEO-F411RE here. (Again, this is not a complete list. I will show you how the Seeed CAN bus shield can be supported in the example projects.)
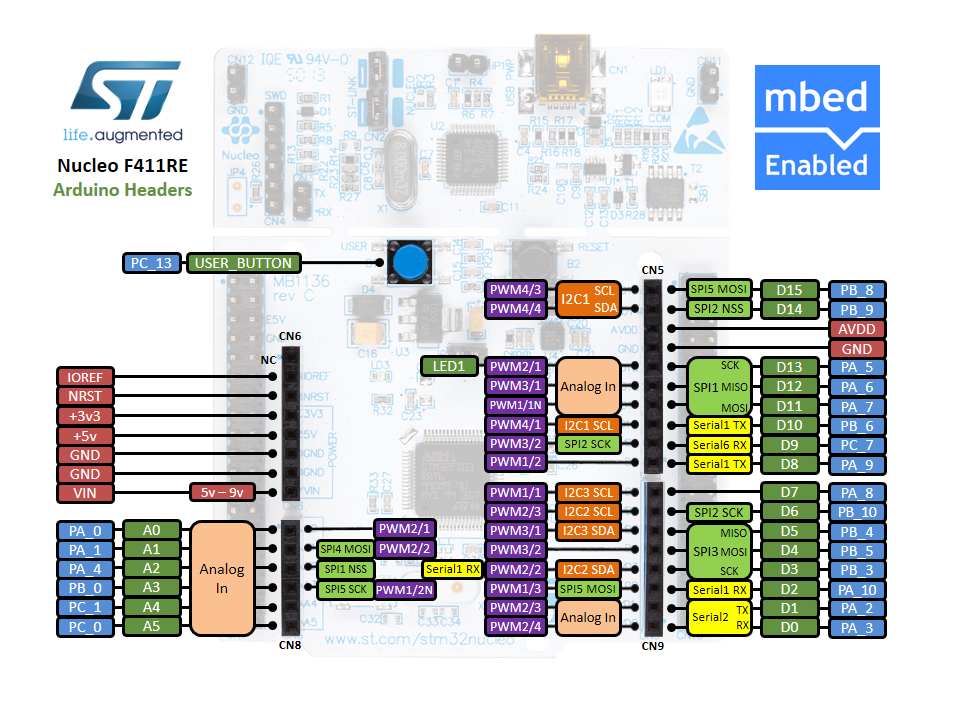
NUCLEO-F411RE Arduino Header
NUCLEO-F411RE Morpho Header
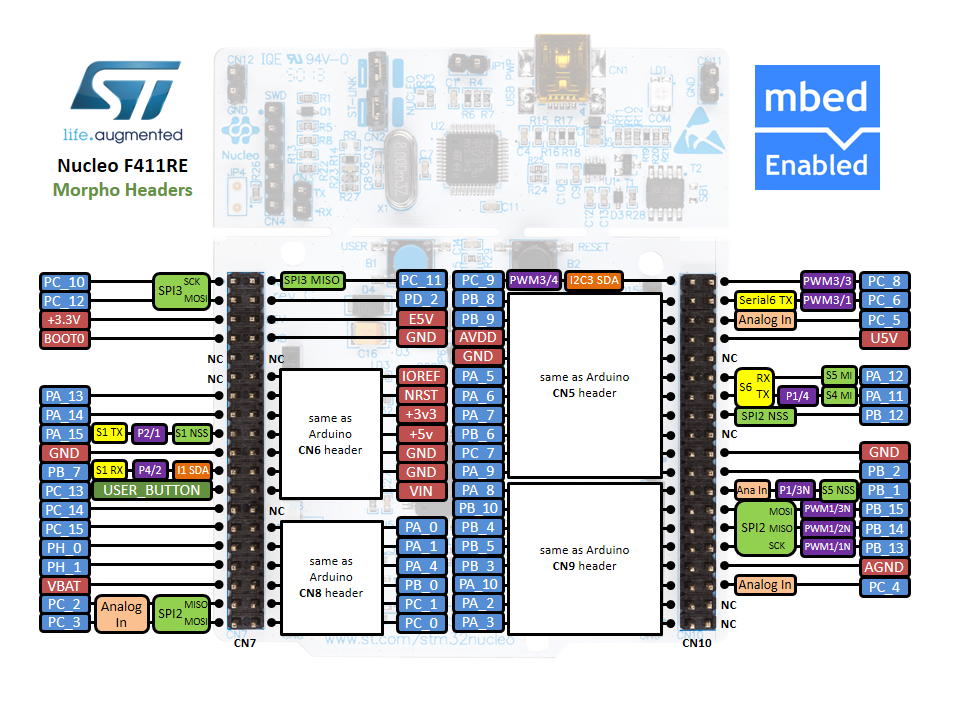
Header images from https://developer.mbed.org
To upload images to the NUCLEO board from your host machine, you will have to install the ST-LINK/V2 driver. On Linux or other UNIX-like machines, you have to do this by building ST-LINK from source. Go to https://github.com/texane/stlink and follow the instruction in the REAME file.
Once the ST-LINK/V2 driver is installed, you have to update the board firmware. You can do this on any platform you wish, as long as you have the ST-LINK/V2 driver installed. Download the firmware here and follow the instruction in the readme.txt file. For all platforms, firmware update can be done using the Java tools provided in the package. If you want to do this on Windows, follow the instruction here.
Now that you have the ST-LINK/V2 driver installed and the firmware updated, you can start configuring, building, and uploading SDVOS for the NUCLEO-F411RE board.
When you configure an SDVOS instance for the NUCLEO-F411RE board, you need to specify the BOARD attribute in the OS object to NUCLEOF411RE. You should also set the CPU name to ARMCortexM4. An example might look like:
CPU ARMCortexM4 {
  OS HELLO_OS {
    STATUS = EXTENDED;
    STARTUPHOOK = TRUE;
    ERRORHOOK = TRUE;
    SHUTDOWNHOOK = FALSE;
    PRETASKHOOK = FALSE;
    POSTTASKHOOK = FALSE;
    USEGETSERVICEID = TRUE;
    USEPARAMETERACCESS = TRUE;
    USERESSCHEDULER = TRUE;
    DEBUGLEVEL = 2;
    BOARD = NUCLEOF411RE;
    DRIVER = "uart/stm32f4xx_uart";
  };
  ...
};
After you configure the kernel with the system generator, the necessary headers and source files will be generated along with the kernel makefile. You can build the kernel by typing make and upload the kernel image to the board with make burn. When you type make burn, you are invoking the st-flash command that comes with the ST-LINK/V2 driver. For the NUCLEO-F411RE board, the upload command is defined in src/board/NUCLEOF411RE/config.mk:
UPLOAD_COMMAND = st-flash write $(BIN) 0x8000000$(BIN) will be replaced by sdvos.bin after you build the kernel.