Example Projects
Example projects using SDVOS on different platforms
Hello World!
In this beginner's project, we will write a simple SDVOS application that uses a single task and two alarms to print some messages over UART. The purpose of this project is to get you started on the basics of SDVOS and the OSEK/AUTOSAR OS standard. Hopefully you will be able to understand how to develop, configure, and deploy an SDVOS project with the help of this example.
Since this project does not involve any architecture specific applications, I will also show you how the target architecture and reference board can be easily changed by editing only the configuration file and reconfiguring the system. To begin with, we will target the NUCLEO-F401RE reference board.
Objectives
In this project, we will create an OSEK/AUTOSAR task called 'task1' which will print 5 time interval messages ("Time elapsed: xxxx") before terminating itself. There will be a one second delay between each message. This make the total duration of the task a little bit more then 5 seconds (print takes some extra time).
Additionally, we will also create two OSEK/AUTOSAR alarms ('ALARM0' and 'ALARM1'). Both of them will have an initial trigger time at 6th second after system initialization and with a 6 second cycle. This means that both alarms will be triggered every 6 seconds since system startup. We can configure an action for each OSEK/AUTOSAR alarm. When an alarm is triggered/expired, its specified action will be invoked.
OSEK Alarms
In this project, we will have 'ALARM0' invoke a callback function that simply prints "Callback" over the serial port. And when 'ALARM1' expires, we would reactivate 'task1'. This configuration leads to a system with 6-second period printing 5 time interval messages and a "Callback" at 1 second interval.
Project Setup
Before starting working on the project, please make sure you followed the earlier tutorials to download the SDVOS source code and install the necessary tools for your target platform. To develop an application for SDVOS, you need to create a directory in the kernel source directory (sdvos/src) called apps. You probably noticed that after downloading the source code, you already have a soft link named 'apps' that points to a project directory in the example applications directory. You can delete this link file and create your own apps directory or point it to your project directory in another location instead.
We will put all the application code, header, and configuration files into the 'apps' directory. When the system generator executes, a partial makefile will be generated according to your 'apps' directory contents. You can place your source files in any directory structures you like inside the 'apps' directory, but ONLY in the 'apps' directory.
For the Hello World project, we will create an 'apps' directory with three files as follows:
./sdvos/
└── src
    └── apps
        ├── isr.c
        ├── task1.c
        └── config.oil
Here, 'isr.c' will contain our implementation of the alarm callback, entry point, and various other hooks. The implementation of 'task1' will be placed into 'task1.c'. And finally, 'config.oil' will be our system configuration file. We will begin with the system configuration.
System Configuration
According to the OSEK specification, an OSEK system can be described using the OIL (OSEK Implementation Language). To configure SDVOS and your application, you will have to write an OIL configuration file first. We will place the configuration for this project in the 'apps/config.oil' file created in the previous step.
In the OIL configuration file, we have to specify various objects used in our application and different kernel configuration parameters. To begin with, let us first add the OIL version, OIL implementation definition, and a 'CPU' object into the config.oil file:
OIL_VERSION = "2.5";

#include <sdvos.oil>

CPU ARMCortexM4 {
};
We gave the CPU object a name of 'ARMCortexM4' since we are targeting the NUCLEO-F401RE board. The first line specifies the OIL version. Version 2.5 is the most up to date. The included file 'sdvos.oil' is the OIL implementation definition. This file is located at 'sdvos/src/sdvos.oil'. We will set the include path when we configure the system.
Now that we have a CPU object, we need to define other objects in the project inside the CPU object. These objects include OS, TASK, APPMODE, COUNTER, and ALARM.
First, let us define the OS parameters in an OS object:
OS HELLO_OS {
  STATUS = EXTENDED;
  STARTUPHOOK = TRUE;
  ERRORHOOK = TRUE;
  SHUTDOWNHOOK = FALSE;
  PRETASKHOOK = FALSE;
  POSTTASKHOOK = FALSE;
  USEGETSERVICEID = TRUE;
  USEPARAMETERACCESS = TRUE;
  USERESSCHEDULER = TRUE;
  DEBUGLEVEL = 2;
  BOARD = NUCLEOF401RE;
  DRIVER = "uart/stm32f4xx_uart";
};
We gave the OS the name 'HELLO_OS'. You can set it to anything you like. This will not affect the behavior of the system. Inside the OS object are various attributes. We set 'STATUS' to 'EXTENDED' so that the kernel will execute with extended status and report more information on service invocations. To see the exact difference between 'EXTENDED' and 'STANDARD' status, please refer to the OSEK OS specification. We next set 'STARTUPHOOK' and 'ERRORHOOK' to 'TRUE'. These allow us to set user defined system startup and service error hook functions. We will have to provide these two hook functions when they are enabled. Additionally, we also disabled 'SHUTDOWNHOOK', 'PRETASKHOOK', and 'POSTTASKHOOK'. These hooks are called when the system shuts down, before a task is scheduled, and after a task has been de-scheduled. They are mostly used for debugging purposes. By setting 'USEGETSERVICEID' and 'USEPARAMETERACCESS', we allow the access to service ID and service parameters in the error hook. However, these are not used in the project unless something went wrong. The 'USERESSCHEDULER' attribute can be used to enable/disable the RES_SCHEDULER resource. It can be used to 'lock' the scheduler. You should take a look at the specification for the details. We will not use any resources in this project.
The other three attributes in the OS object are SDVOS specific. The 'DEBUGLEVEL' attribute can be used to configure the debug message level. It can only be set to 0, 1, or 2. The higher the debug level, the more debug information you will get. When set to 0, no debug message will be printed. This also saves flash memory since the string constants will not be included in the binary. The 'BOARD' attribute is used to specify the target board. Here, we set it to 'NUCLEOF401RE'. The 'DRIVER' attributes are used to load board specific drivers. You can define multiple drivers. And the order of them does matter. The drivers will be initialized based on the order of the driver attributes. Here, we only enabled the UART driver on the NUCLEO board for serial output.
Before specifying tasks and alarms, we first define the application modes used in this project:
APPMODE AppMode0 {
  DEFAULT = TRUE;
};

APPMODE AppMode1 {
};
An application mode must be specified before starting an OS instance. In SDVOS, it is nothing more than an ID, which decides which tasks, alarms, or schedule tables will be automatically started by the OS so that you can start the OS in different mode under different application contexts. In this project, we defined two application mode, with AppMode0 being the default.
Next up we define the TASK object for 'task1':
TASK task1 {
  PRIORITY = 1;
  SCHEDULE = FULL;
  ACTIVATION = 1;
  AUTOSTART = TRUE {
    APPMODE = AppMode0;
    APPMODE = AppMode1;
  };
  STACKSIZE = 0x100;
};
The name 'task1' can be used in our application to refer to the actual task when invoking system services. We set the priority of 'task1' to 1. This really does not matter since we have only one task. 0 is the lowest priority in OSEK OS. In SDVOS, this priority is reserved for the idle task. We also set the scheduling policy of this task to 'FULL'. This allows the task to be scheduled fully preemptively. It means that a task which is presently running may be rescheduled at any instruction by the occurrence of trigger conditions pre-set by the operating system. Full preemptive scheduling will put the running task into the ready state, as soon as a higher priority task becomes runnable. The task context is saved so that the preempted task can be continued at the location where it was preempted.
In OSEK/AUTOSAR OS, a task can be activated multiple times. The activations of a task can be queued. We set the activation limit of 'task1' to 1 so that activation of the task cannot be queued. This means that we can only activate 'task1' when the previous activation of it is terminated, otherwise the task activation service will return an error. We also set 'task1' to be auto-started by the OS in all both AppMode0 and AppMode1.
Finally, we set the stack size of 'task1' to 256 bytes. On ARM Cortex M4, SDVOS uses a single separate kernel stack. The task stack is dedicated to the task execution under the task context. This is enough for the simple 'task1' in our project.
Now that we have the task object defined, it is time to start working on the two alarms we need. However, before doing so, we have to first configure the system counter object. In OSEK/AUTOSAR OS, a counter can either be a hardware or software timer. All OSEK/AUTOSAR OSes come with at least one counter called 'SYS_COUNTER' that serves as the kernel time source. In SDVOS, the 'SYS_COUNTER' is a software counter that is backed by the hardware timer on your hardware platform. The default tick duration of SDVOS is 1 millisecond. This is the case for all the platforms SDVOS currently supports. It is possible to change the tick duration. However, we will not cover it in this tutorial.
The 'SYS_COUNTER' in this example project is defined as follows:
COUNTER SYS_COUNTER {
  MINCYCLE = 10;
  MAXALLOWEDVALUE = 0xFFFF;
  TICKSPERBASE = 1;
};
We set the counter count to match the system tick value by setting 'TICKSPERBASE' to 1. This means that the counter counts in millisecond. We set the 'MINCYCLE' of the 'SYS_COUNTER' to 10 so that all the cyclic identities (alarms, schedule tables) can have a minimum cycle of 10 millisecond or more, but not less. The 'MAXALLOWEDVALUE' specifies the maximum counter count before it wraps around to 0.
With the 'SYS_COUNTER' defined, we now have the time source to define the alarms we want to use in this project. As mentioned earlier in the objectives, we need two alarms, both with 6 second initial wait time and 6 second cycle.
ALARM ALARM0 {
  COUNTER = SYS_COUNTER;
  ACTION = ALARMCALLBACK {
    ALARMCALLBACKNAME = "ALARM0_CALLBACK";
  };
  AUTOSTART = TRUE {
    ALARMTIME = 6000;
    CYCLETIME = 6000;
    APPMODE = AppMode0;
  };
};

ALARM ALARM1 {
  COUNTER = SYS_COUNTER;
  ACTION = ACTIVATETASK {
    TASK = task1;
  };
  AUTOSTART = TRUE {
    ALARMTIME = 6000;
    CYCLETIME = 6000;
    APPMODE = AppMode0;
  };
};
Since both alarms are associated with the 'SYS_COUNTER', their time units are all in millisecond. Hence the 'AUTOSTART' attribute has 'ALARMTIME' and 'CYCLETIME' both set to 6000, which are 6 seconds. They will all be auto-started in AppMode0. 'ALARM0' has its action set to 'ALARMCALLBACK'. We will provide the callback function called 'ALARM0_CALLBACK' later. The action of 'ALARM1' is instead set to 'ACTIVATETASK', and we will activate 'task1'.
The final complete OIL configuration file is as follows:
OIL_VERSION = "2.5";

#include <sdvos.oil>

CPU ARMCortexM4 {
  OS HELLO_OS {
    STATUS = EXTENDED;
    STARTUPHOOK = TRUE;
    ERRORHOOK = TRUE;
    SHUTDOWNHOOK = FALSE;
    PRETASKHOOK = FALSE;
    POSTTASKHOOK = FALSE;
    USEGETSERVICEID = TRUE;
    USEPARAMETERACCESS = TRUE;
    USERESSCHEDULER = TRUE;
    DEBUGLEVEL = 2;
    BOARD = NUCLEOF401RE;
    DRIVER = "uart/stm32f4xx_uart";
  };

  APPMODE AppMode0 {
    DEFAULT = TRUE;
  };

  APPMODE AppMode1 {
  };

  TASK task1 {
    PRIORITY = 1;
    SCHEDULE = FULL;
    ACTIVATION = 1;
    AUTOSTART = TRUE {
      APPMODE = AppMode0;
      APPMODE = AppMode1;
    };
    STACKSIZE = 0x100;
  };

  COUNTER SYS_COUNTER {
    MINCYCLE = 10;
    MAXALLOWEDVALUE = 0xFFFF;
    TICKSPERBASE = 1;
  };

  ALARM ALARM0 {
    COUNTER = SYS_COUNTER;
    ACTION = ALARMCALLBACK {
      ALARMCALLBACKNAME = "ALARM0_CALLBACK";
    };
    AUTOSTART = TRUE {
      ALARMTIME = 6000;
      CYCLETIME = 6000;
      APPMODE = AppMode0;
    };
  };

  ALARM ALARM1 {
    COUNTER = SYS_COUNTER;
    ACTION = ACTIVATETASK {
      TASK = task1;
    };
    AUTOSTART = TRUE {
      ALARMTIME = 6000;
      CYCLETIME = 6000;
      APPMODE = AppMode0;
    };
  };
};
Application Implementation
To begin with, let us first open 'sdvos/src/apps/task1.c' and add the implementation of 'task1'.
#include <osek/osek.h>
#include <debug.h>
#include <sdvos.h>
#include <sdvos_printf.h>

TASK (task1)
{
  TickType cur = 0;
  TickType elapsed = 0;

  GetCounterValue (SYS_COUNTER, &cur);
  Delay (SYS_COUNTER, 1000);
  GetElapsedValue (SYS_COUNTER, &cur, &elapsed);
  sdvos_printf ("Time elapsed: %d\n", elapsed);

  GetCounterValue (SYS_COUNTER, &cur);
  Delay (SYS_COUNTER, 1000);
  GetElapsedValue (SYS_COUNTER, &cur, &elapsed);
  sdvos_printf ("Time elapsed: %d\n", elapsed);

  GetCounterValue (SYS_COUNTER, &cur);
  Delay (SYS_COUNTER, 1000);
  GetElapsedValue (SYS_COUNTER, &cur, &elapsed);
  sdvos_printf ("Time elapsed: %d\n", elapsed);

  GetCounterValue (SYS_COUNTER, &cur);
  Delay (SYS_COUNTER, 1000);
  GetElapsedValue (SYS_COUNTER, &cur, &elapsed);
  sdvos_printf ("Time elapsed: %d\n", elapsed);

  GetCounterValue (SYS_COUNTER, &cur);
  Delay (SYS_COUNTER, 1000);
  GetElapsedValue (SYS_COUNTER, &cur, &elapsed);
  sdvos_printf ("Time elapsed: %d\n", elapsed);

  TerminateTask ();

  return E_OK;
}
The source code is mostly self explanatory. Just notice that the name of the task must be set to 'task1' or whatever you configured it to be in the OIL file. The task simply prints 5 time interval messages each with a 1 second delay. When you call the SDVOS Delay function, you have to specify the base counter of the delay and the delay counts. The sdvos_printf function is similar to the libc printf. However, it is a simplified implementation that only handles up to 32 bit integer values.
Next up, let us open 'sdvos/src/apps/isr.c' to add callbacks and hooks:
#include <osek/osek.h>
#include <debug.h>
#include <sdvos.h>
#include <sdvos_printf.h>

void
ALARM0_CALLBACK ()
{
  sdvos_printf ("Callback\n");
}

void
ErrorHook (StatusType e)
{
  DEBUG_PRINTF ("Error: (%d)\n", OSErrorGetServiceId ());
}

void
StartupHook ()
{
}

int
main (void)
{
  StartOS (OSDEFAULTAPPMODE);

  /* Should not reach here */
  while (1) {};

  return 0;
}
We first added the implementation of the callback function for 'ALARM0'. The name of this function must match the name in the OIL file. In the callback, we simply print a message: "Callback". Additionally, since we enabled error and startup hooks in the OS object, they need to be implemented. The name of these two functions are fixed, they have to be called 'ErrorHook' and 'StartupHook' respectively. The 'ErrorHook' function also takes an error status as input parameter. In the error hook, we simply printed the service ID that caused the error. Notice that here we used 'DEBUG_PRINTF' instead of 'sdvos_printf'. The difference of these two being the former is a macro that can be controlled by the 'DEBUGLEVEL' attribute in the OS object. If the debug level is greater than 1, 'DEBUG_PRINTF' will be defined as 'sdvos_printf'. Even though not used in this project, 'DEBUG_PRINTFV' can also be used to print debug messages. But it is removed unless debug level is 2.
In this project, we have nothing in the startup hook function, you can put whatever you want in the hook. It will be called right before SDVOS enables the scheduling of user tasks.
Finally, we have the entry point function of the application implemented. This looks just like the main function of any C programs. However, in this function, you need to call the 'StartOS' service to initialize the system. You must also specify the application mode. Here, we used the 'OSDEFAULTAPPMODE' macro, which is defined as the default application mode. Remember that in the OIL file, we specified the default application mode to be 'AppMode0'.
Generate System Image
After implementing all the objects in the application and writing up the configuration file, we can now generate the SDVOS instance with the help of the SDVOS System Generator (sdvgen). You can do this with the following commands:
bash$ cd sdvos/src
bash$ sdvgen -s . -i . -r apps/config.oil
The output should be something similar to the following:

For details on how to use sdvgen, please check the manual page or the tutorial page here. Basically, we need to specify the SDVOS source directory path and the OIL include directory path (where the 'sdvos.oil' file is in our case) with '-s' and '-i' options. You do not necessarily have to change your directory to 'sdvos/src' as did in the example.
With the '-r' option, you can ask the system generator to print the configuration and resource statistics. As can be seen in the screen shot, the statistics match the configurations in the OIL file we wrote earlier.
If everything went well, the system generator should have generated four files for your project (as shown at the end of the screen shot). You can now build the system image by typing make in the SDVOS source directory:
bash$ makeOptionally, you can ask the system generator to do this for you when you configure the system:
bash$ sdvgen -s . -i . -r -m apps/config.oilThe '-m' option is essentially asking the system generator to append a make command after all the configuration files are generated successfully.
If make succeeded, the system image should be ready. For the NUCLEOF401RE board, you should see a file called 'sdvos.bin' in the 'src' directory.
If you want to clean up the binaries and image, you can type:
bash$ make cleanIf you want to clean up the configuration files generated by the system generator, you can type:
bash$ make clean-configUpload System Image
To upload the binary image onto the NUCLEOF401RE board, you have to first plug the board into your development machine. Make sure you followed the tutorial here to install the necessary tools. Change directory to the SDVOS source directory, and type the following command to upload:
bash$ sudo make burnExamine the Output
All the messages printed by 'sdvos_printf' on the NUCLEOF401RE board will go to the UART interface (USART2). When you plug the board into your Linux development machine, the interface should be accessible at /dev/ttyACM0 (Assuming you do not have other USB ACM devices plugged in).
Open your minicom with '-s' option and configure the serial interface as follows:
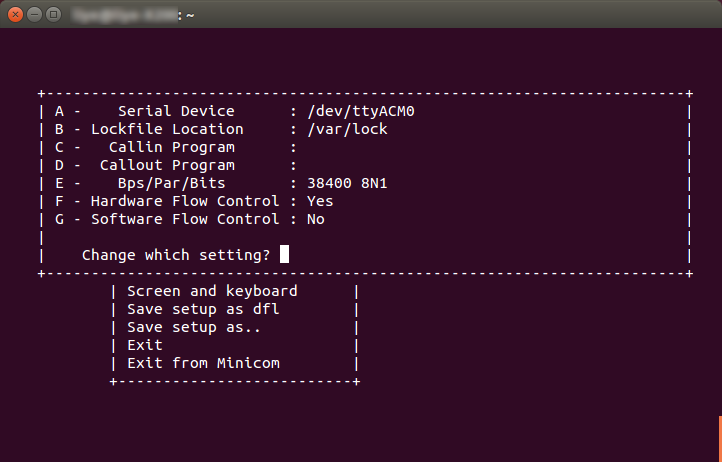
After the serial interface is configured, select 'Exit' and press the reset button on the NUCLEOF401RE board, you should see the output of our Hello World application as follows:
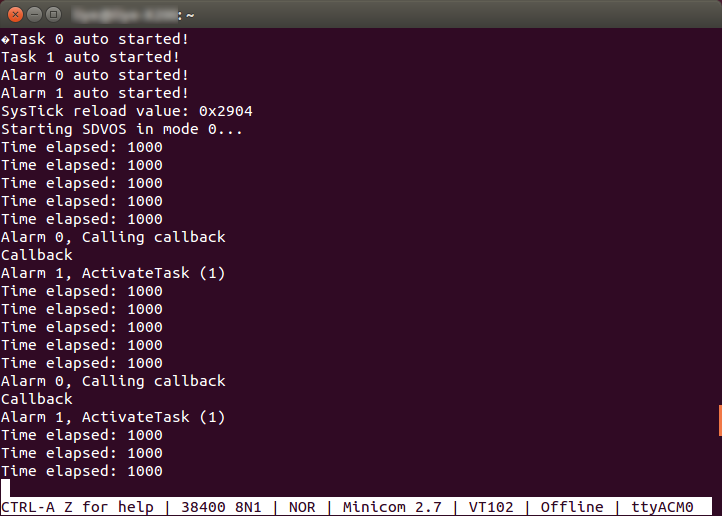
You can now make any changes you like to the application source, re-build the system image, and upload it to the board to see the results.
Change Target Platform
You just had your first SDVOS application running! Now, since this project only involves printing messages and architecture independent objects such as SYS_COUNTER, we can easily change the target platform with the help of the OIL file and the system generator. Let us first try to configure the project for the Linux platform. To do this, you should open 'sdvos/src/apps/config.oil' and make the following changes:
OIL_VERSION = "2.5";

#include <sdvos.oil>

CPU LINUX {
  OS HELLO_OS {
    STATUS = EXTENDED;
    STARTUPHOOK = TRUE;
    ERRORHOOK = TRUE;
    SHUTDOWNHOOK = FALSE;
    PRETASKHOOK = FALSE;
    POSTTASKHOOK = FALSE;
    USEGETSERVICEID = TRUE;
    USEPARAMETERACCESS = TRUE;
    USERESSCHEDULER = TRUE;
    DEBUGLEVEL = 2;
    BOARD = LINUX;  // <-- Change the target board
    DRIVER = "uart/linux_uart";  // <-- Use Linux specific driver
  };

  ...

  TASK task1 {
    PRIORITY = 1;
    SCHEDULE = FULL;
    ACTIVATION = 1;
    AUTOSTART = TRUE {
      APPMODE = AppMode0;
      APPMODE = AppMode1;
    };
    STACKSIZE = 4096;  // <-- Increase stack size
  };

  ...
};
We first changed the 'BOARD' attribute to 'LINUX' and added the Linux specific UART driver (SDVOS actually prints to your terminal in Linux, not serial interface). And since a Linux process consumes much bigger stack space, we set the stack size of 'task1' to 4KB (Not really necessary for the simple task we have, but we have plenty of memory on Linux anyway).
That is it! We are now ready to re-configure the system and generate the image for the Linux platform with the following commands:
cd sdvos/src
bash$ make clean
bash$ make clean-config
bash$ sdvgen -s . -i . -r -m apps/config.oil
Execute the image as a Linux process in your terminal with the following command:
bash$ make burnYou should see an output similar to that of the NUCLEOF401RE board in your terminal.
Similarly, you can also switch to the Arduino UNO platform with the following configuration:
OIL_VERSION = "2.5";

#include <sdvos.oil>

CPU AVR5 {
  OS HELLO_OS {
    STATUS = EXTENDED;
    STARTUPHOOK = TRUE;
    ERRORHOOK = TRUE;
    SHUTDOWNHOOK = FALSE;
    PRETASKHOOK = FALSE;
    POSTTASKHOOK = FALSE;
    USEGETSERVICEID = TRUE;
    USEPARAMETERACCESS = TRUE;
    USERESSCHEDULER = TRUE;
    DEBUGLEVEL = 2;
    BOARD = ARDUINO_UNO;  // <-- Change the target board
    DRIVER = "uart/atmega328p_uart";  // <-- Use Arduino specific driver
  };

  ...

  TASK task1 {
    PRIORITY = 1;
    SCHEDULE = FULL;
    ACTIVATION = 1;
    AUTOSTART = TRUE {
      APPMODE = AppMode0;
      APPMODE = AppMode1;
    };
    STACKSIZE = 0x80;  // <-- Reduce stack size
  };

  ...
};
Conclusion
Hopefully, you have just successfully developed your first SDVOS application on your target board. Try to play around as much as possible on the basis of this project. There are still a lot more to learn! Please report any bug you found to me via email. Also, feel free to contact me via email if you have any questions.